Molded Chocolate Bunny

Gluten Free
Dairy Free
Low Fod Map
Health score
4%
Molded Chocolate Bunny
45 min.
15
367kcal

Suggestions


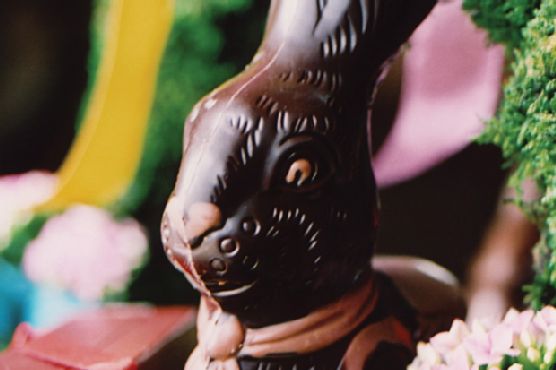
Indulge in the whimsical world of chocolate with this delightful Molded Chocolate Bunny recipe! Perfect for celebrations, Easter festivities, or simply as a special treat, these charming bunnies not only look adorable but are also crafted to accommodate a variety of dietary preferences. With the assurance of being gluten-free, dairy-free, and low FODMAP, everyone can enjoy this sweet treat without worry.

Mastering the art of chocolate molding may seem daunting, but this recipe guides you through a fun and creative process that brings out the artist in you. By tempering high-quality bittersweet chocolate and using colorful cocoa butter for detailing, you'll create stunning chocolate bunnies that are sure to impress friends and family alike. Whether they’re for a festive gathering or a sweet surprise for loved ones, each bunny can be personalized with unique designs, making them a heartfelt gift or a playful centerpiece.

Get ready to unleash your creativity and enjoy the rich, luscious flavors of homemade molded chocolate. This recipe delivers not just a treat for the taste buds but also a delightful experience that will leave a lasting impression. So, gather your supplies, roll up your sleeves, and get set to create your own delightful chocolate bunnies that are not just delicious but also a joy to behold!

Ingredients

  • pounds bittersweet chocolate 
  • ounces cocoa butter 

Equipment

  • bowl
  • baking sheet
  • ladle
  • baking paper
  • knife
  • wire rack
  • kitchen towels
  • offset spatula

Directions

  1. If you are going to paint the bunny's face and other elements, decide on the colors you are going to use and then divide the cocoa butter into the number of colors selected.
  2. Place the cocoa butter in a yogurt maker (see tips, below) or individual stainless-steel bowls, using enough cocoa butter to keep it liquid, work the coloring powder into each one, and then, using a small paint brush, carefully paint the features directly onto the interior of the mold. (See tips, below.) Allow the cocoa butter to set for about 30 minutes, then proceed with the recipe. If you don't have the time or energy to make the cocoa butter colors, simply paint the face with tempered milk or white chocolate.
  3. Place a wire rack on a baking sheet lined with parchment paper. Set aside.
  4. Place the tempered chocolate in a warmed bowl.
  5. Clip the two parts of the mold together. Then, holding the mold upside down, pour the tempered chocolate into the mold. When it is full, immediately empty it back into the same bowl. The mold should be evenly coated with anywhere from 1/16 to 1/8 inch of chocolate. Tap the edge of the mold to release any air bubbles that might remain in the chocolate, to ensure a perfectly smooth coating. Wipe the edge of the mold clean on the edge of the bowl (you don't want to waste a drop of chocolate) and place the mold, open end down, on the wire rack.
  6. Let stand for about 5 minutes, or until the chocolate has begun to set.
  7. Once the chocolate hardens, using a pairing knife, scrape the open end of the mold clean. As the chocolate hardens, it will retract from the mold, and the clean edge helps prevent the chocolate from sticking and cracking as it shrinks. (If your kitchen is warm, place the mold in the refrigerator for a couple of minutes to facilitate hardening.)
  8. Repeat this process 2 more times, allowing the chocolate to thoroughly harden between pourings, to give a nice thick, child-friendly coating of chocolate.
  9. Once the chocolate has set, unclip the mold and lift the plastic from the chocolate form. If desired, wrap in cellophane and store in a cool, dry spot for up to 5 days.
  10. You can add flair to molded figures with just a few brushstrokes. In general, the area to be painted in a mold is small, so you don't need to mix a large amount of "paint." I recommend using a yogurt maker (the type that has a few small containers) to mix and hold the paints. The temperature of the machine is perfect to keep the paint warm enough to remain constantly spreadable. It is a great place to store cocoa butter paint, too. (Of course, you can also use small stainless-steel bowls over hot water, but the yogurt maker makes the job much easier.) For each color, place a few tablespoons of cocoa butter in a yogurt container.
  11. Mix in powdered food coloring, a tiny bit at a time, until the desired color is reached. Then, using a fine-tipped paintbrush, carefully apply the paint to the interior area of the mold you are coloring (for example, red might be used to paint on the mouth of a human or animal figure). Allow the paint to set for about 30 minutes before you proceed with the recipe.
  12. You cannot mold tempered chocolate successfully in wood or other porous materials. Nor is glass a good choice. When you pour tempered chocolate into a glass mold, it immediately takes on the temperature of the glass, which if it is too hot or too cold will cause the chocolate to go out of temper. Antique metal molds, with interiors that have been damaged through years of use or the passage of time, are best used as wall decorations. Flexible plastic molds are terrific, but in time they begin to show wear and must be replaced. All of this is my way of saying that firm plastic and polycarbonate molds are the best choices for molding chocolate.
  13. Although you might have heard that coating a mold with fat will make removing the finished product easier, do not try it. It will not help unmold the item; it will only make it greasy. Chocolate, like plaster, retracts as it cools, which ensures that once it has set it will easily pull away from a plastic mold. Remember, chocolate reflects the surface against which it has been molded, so if properly done, the set chocolate will be smooth and shiny. However, the chocolate must be tempered—not simply melted—or it won't release.
  14. Before you begin to fill a mold, set up your workspace: Have the tempered chocolate in a bowl. Alongside the chocolate have the mold; a ladle; a paring knife; pastry scraper; large metal offset spatula, or other smooth-edged utensil; a wire rack on a parchment- or waxed paper-lined baking sheet; and some clean kitchen towels.
  15. Using the ladle, carefully fill the mold with the liquid chocolate. Once the mold is full, invert it over the bowl of tempered chocolate and allow the excess chocolate to drop back into the bowl. If the mold is finely detailed, it will be necessary to tap on the sides to release any air bubbles that might form in the raised detail. The mold should now be evenly coated with a thin layer (usually 1/8 or 1/16 inch thick, depending on the recipe) of chocolate. Wipe the edge of the mold, or the edge surrounding each cup in the mold, clean with a paring knife or pastry scraper.
  16. Place the chocolate-coated mold, open side down, on the wire rack.
  17. Let stand for about 5 minutes, or until the chocolate begins to harden. Using the paring knife, scrape the edge of the mold absolutely clean of hardened chocolate. This is important, because the chocolate retracts from the sides of the mold as it sets, and a clean edge will keep it from sticking and cracking as it shrinks. If desired, you can place the mold in the refrigerator for a few minutes to speed the hardening, but do not leave it there for any length of time.
  18. Once you have invested in molds, they can be used over and over again. My best advice for extending the life of plastic or polycarbonate molds is to clean them with care. Wash them in hot, soapy water, carefully wiping them clean with a soft cloth (never any rough material or a scouring pad). Then rinse them well under running water and dry thoroughly, as water deposits can be as damaging to molds as scratchy scrubbers.
  19. Reprinted with permission from Jacques Torres’ A Year in Chocolate: 80 Recipes for Holidays and Special Occasions by Jacques Torres, ©2008 Stewart, Tabori, & Chang

Nutrition Facts

Calories367kcal
Protein5.41%
Fat56.89%
Carbs37.7%

Properties

Glycemic Index
0
Glycemic Load
0
Inflammation Score
-6
Nutrition Score
12.320434896842%

Flavonoids

Catechin
4.9mg
Epicatechin
14.85mg
Quercetin
0.76mg

Nutrients percent of daily need

Calories:367.41kcal
18.37%
Fat:24.21g
37.24%
Saturated Fat:13.93g
87.09%
Carbohydrates:36.08g
12.03%
Net Carbohydrates:28.44g
10.34%
Sugar:22.33g
24.82%
Cholesterol:3.63mg
1.21%
Sodium:7.64mg
0.33%
Alcohol:0g
100%
Alcohol %:0%
100%
Caffeine:69.4mg
23.13%
Protein:5.18g
10.37%
Manganese:1.09mg
54.57%
Copper:1.04mg
52.06%
Magnesium:144.17mg
36.04%
Fiber:7.64g
30.54%
Iron:4.87mg
27.07%
Phosphorus:212.73mg
21.27%
Zinc:2.12mg
14.12%
Potassium:457.83mg
13.08%
Selenium:6.16µg
8.8%
Calcium:47.17mg
4.72%
Vitamin K:4.54µg
4.33%
Vitamin B3:0.67mg
3.36%
Vitamin B2:0.05mg
2.81%
Vitamin E:0.36mg
2.43%
Vitamin B5:0.2mg
2.01%
Vitamin B12:0.11µg
1.81%
Vitamin B1:0.03mg
1.68%
Vitamin B6:0.03mg
1.47%
Source:Epicurious