Oven-Smoked Bacon

Gluten Free
Dairy Free
Low Fod Map
Health score
6%
Oven-Smoked Bacon
12990 min.
13
1147kcal

Suggestions


Are you ready to elevate your culinary skills and impress your friends and family with a mouthwatering treat? Look no further than this Oven-Smoked Bacon recipe! Perfectly gluten-free, dairy-free, and low FODMAP, this dish caters to a variety of dietary needs while delivering an explosion of flavor that will leave everyone craving more.

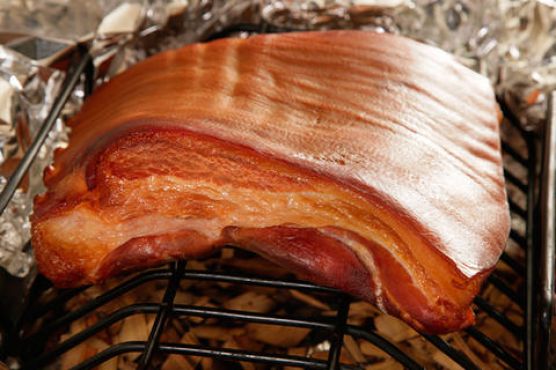
Imagine the rich aroma of apple wood or hickory wafting through your kitchen as you create your very own homemade bacon. This recipe takes you on a journey of flavor, starting with a simple curing process that infuses the pork belly with a delightful blend of sugar and kosher salt. The result? A tender, smoky masterpiece that is perfect for any meal of the day—be it a hearty breakfast, a savory lunch, or a satisfying dinner.

With a preparation time of just under 130 minutes and enough servings to feed a crowd, this Oven-Smoked Bacon is not only a delicious addition to your table but also a fantastic way to bond with loved ones over the art of cooking. So, roll up your sleeves, gather your ingredients, and get ready to savor the satisfaction of creating your very own bacon from scratch. Your taste buds will thank you!
Ingredients

  • tablespoons granulated sugar 
  • tablespoons kosher salt 
  • cups fries 
  • pound pork belly fresh whole ()
  • 0.8 teaspoon salt 

Equipment

  • bowl
  • frying pan
  • baking sheet
  • paper towels
  • oven
  • wire rack
  • plastic wrap
  • roasting pan
  • kitchen thermometer
  • aluminum foil
  • ziploc bags

Directions

  1. Combine the kosher salt, sugar, and curing salt in a small bowl.Trim off any uneven edges on the pork belly.
  2. Place the belly skin-side down on a work surface.
  3. Sprinkle it evenly with half of the curing mixture and rub the mixture into the meat until it’s absorbed. Flip the belly over and sprinkle it evenly with the remaining curing mixture.
  4. Let it sit until the curing mixture is absorbed and moisture has beaded on top, about 5 minutes.
  5. Place the belly in an extra-large (2- to 2-1/2-gallon) resealable plastic bag. (Alternatively, you can place it in a roasting pan and cover it tightly with aluminum foil.) Refrigerate for 7 days, flipping the belly every other day.When the belly is ready, fit a wire rack over a baking sheet.
  6. Remove the belly from the bag, rinse it under cool water, and pat it very dry with paper towels.
  7. Let the pork belly sit at room temperature for 1 hour. Meanwhile, remove all of the racks from the oven except one arranged in the lowest position.
  8. Heat the oven to 200°F.Line the inside of a roasting pan crosswise with the foil, overlapping it in the center of the pan by about 1 inch. Make sure that the bottom and sides of the pan are completely covered and that the excess foil extends over the long sides and slightly up and over the short sides of the pan. Scatter the wood chips in an even layer over the foil in the bottom of the pan. Fit a roasting rack over the chips. (The roasting rack should sit at least 1 1/2 inches above the bottom of the pan. You can try flipping it over if needed. If your roasting rack still sits too low, use a wire steaming or cooling rack that sits at least 1 1/2 inches above the bottom of the pan.)
  9. Place the belly on the rack skin-side up. Bring the long edges of the foil up to meet in the middle. Fold the foil down twice and crimp it to close tightly, making sure it is not touching the belly so that the smoke can circulate around it. Bring up the foil on the sides to meet the top seam and crimp, making sure the entire rack and belly are completely surrounded with foil.
  10. Place the roasting pan across two burners over medium-high heat until a steady stream of smoke pours out of the top seam of the foil bundle, about 5 minutes. (This step doesn’t produce a ton of smoke, but you still may want to open a window or turn on the fan above your range.)
  11. Place the pan in the oven and smoke until the pork belly reaches 150°F on an instant-read thermometer, about 4 to 6 hours.
  12. Remove the pan to a wire rack. Carefully open the top seam of the foil and let the bacon cool to room temperature.
  13. Cut off and discard the skin. Wrap the bacon tightly in plastic wrap and refrigerate it overnight before slicing and cooking. It can be kept tightly wrapped for up to 2 weeks in the refrigerator or up to 3 months in the freezer, but before freezing, be sure to wrap the bacon in plastic wrap and then foil to prevent freezer burn.

Nutrition Facts

Calories1147kcal
Protein6.58%
Fat83.22%
Carbs10.2%

Properties

Glycemic Index
10.34
Glycemic Load
16.3
Inflammation Score
-1
Nutrition Score
14.483043513868%

Nutrients percent of daily need

Calories:1147.39kcal
57.37%
Fat:106.09g
163.22%
Saturated Fat:37.86g
236.61%
Carbohydrates:29.27g
9.76%
Net Carbohydrates:25.18g
9.16%
Sugar:1.84g
2.05%
Cholesterol:125.61mg
41.87%
Sodium:3319.13mg
144.31%
Alcohol:0g
100%
Alcohol %:0%
100%
Protein:18.87g
37.74%
Vitamin B3:10.15mg
50.73%
Vitamin B1:0.76mg
50.55%
Vitamin B2:0.45mg
26.51%
Phosphorus:258.48mg
25.85%
Vitamin B12:1.47µg
24.42%
Selenium:14.43µg
20.61%
Potassium:714.65mg
20.42%
Vitamin B6:0.39mg
19.53%
Fiber:4.09g
16.38%
Zinc:2.09mg
13.91%
Iron:2.13mg
11.85%
Manganese:0.22mg
11.22%
Vitamin B5:0.94mg
9.38%
Vitamin C:6.26mg
7.58%
Copper:0.12mg
6.11%
Magnesium:23.43mg
5.86%
Folate:21.76µg
5.44%
Vitamin E:0.68mg
4.54%
Calcium:18.68mg
1.87%
Source:Chow