Halloween Spiderweb Cookies

Vegetarian
Gluten Free
Dairy Free
Low Fod Map
Halloween Spiderweb Cookies
45 min.
24

Suggestions


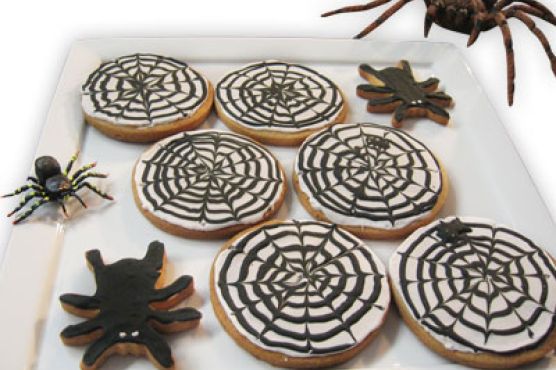
Get ready to enchant your Halloween festivities with these delightful Halloween Spiderweb Cookies! Perfect for both kids and adults, these eye-catching treats are not only fun to make but also cater to a variety of dietary needs, being vegetarian, gluten-free, dairy-free, and low FODMAP. Imagine the excited faces of your guests as they indulge in these spooky yet scrumptious cookies, artfully designed to resemble intricate spiderwebs!

The process of creating these cookies is an enjoyable activity, ideal for gatherings or as a fun project with family and friends. Using simple kitchen tools, you’ll pipe a creamy white icing and rich black accents to craft a mesmerizing spiderweb pattern that’s sure to be the centerpiece of your Halloween spread. Each cookie is a canvas for your creativity, allowing you to unleash your inner artist while you layer flavors and colors.

Not only will these cookies impress with their stunning design, but they offer a balanced sweet treat that everyone can enjoy. With a manageable preparation time of just 45 minutes, you can whip up a batch to share or even gift them in festive packaging. So roll up your sleeves, gather your ingredients, and let’s set the stage for a Halloween celebration that’s as delightful to eat as it is to behold!

Ingredients

  • 24 servings food coloring black
  •  batches decorating icing 

Equipment

  • bowl
  • toothpicks
  • wax paper
  • pastry bag
  • offset spatula

Directions

  1. Make thin icing: In large bowl, stir together 1 batch icing and 2 tablespoons water. Fit 1 pastry bag with #3-size tip and fill with thin icing.
  2. Color thicker icing: Divide second batch icing between 2 medium bowls. To icing in 1 bowl, gradually mix in black food coloring until icing is black. Fit second pastry bag with second #3-size tip and fill with black icing.
  3. Fit third pastry bag with #1-size tip and fill with remaining (thicker) white icing.
  4. Pipe border: Using pastry bag with #1 tip and thicker white icing, pipe around outer edge of 1 cookie. Repeat with remaining cookies and let set 2 minutes.
  5. "Flood" to fill center: Using pastry bag with #3 tip and thinner white icing, squirt pool of icing into center of 1 cookie, then spread to edge with small offset spatula. Repeat with second cookie, giving first time to set.
  6. Pipe circles: Returning to first cookie, using pastry bag with black icing, pipe concentric circles over white icing, beginning in center and ending almost at edge. Repeat with second cookie, giving first time to set.
  7. Form spiderweb pattern: Returning to first cookie, position tip of toothpick in center and drag through icing out to edge. Wipe tip and repeat 7 more times to make 8 evenly spaced, radiating lines like spokes of wheel.
  8. Next, position tip at edge, halfway between 2 lines, and drag inward to center to create another line. Wipe tip and repeat 7 more times to make 8 more lines between first
  9. Repeat process with second iced cookie. Repeat with remaining cookies, working in batches of 2 to allow icing to partially set, but not harden, between steps.
  10. Let cookies dry, uncovered, at room temperature 10 hours or overnight. (Once dry, cookies will keep, layered between sheets of wax paper or parchment, in airtight container at room temperature 1 week.)

Nutrition Facts

Calories0kcal
Protein0%
Fat34.93%
Carbs65.07%

Properties

Glycemic Index
1.79
Glycemic Load
0.02
Inflammation Score
0
Nutrition Score
0.0013043477969325%

Nutrients percent of daily need

Calories:0.35kcal
0.02%
Fat:0.01g
0.02%
Saturated Fat:0g
0.02%
Carbohydrates:0.06g
0.02%
Net Carbohydrates:0.06g
0.02%
Sugar:0.05g
0.06%
Cholesterol:0mg
0%
Sodium:0.15mg
0.01%
Alcohol:0g
100%
Alcohol %:0%
100%
Protein:0g
0%
Source:Epicurious