How to Make Homemade Sausage

Gluten Free
Dairy Free
Popular
Health score
40%
How to Make Homemade Sausage
45 min.
5
1500kcal

Suggestions


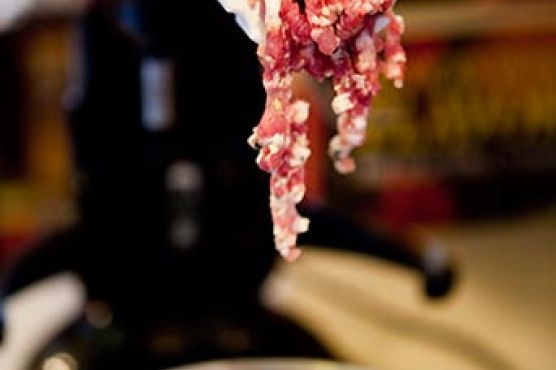
Are you ready to elevate your culinary game and impress your family and friends with a homemade delicacy? Making your own sausage might sound intimidating, but it's an incredibly rewarding experience that can be mastered in just 45 minutes. Whether you're planning a delightful lunch or a heartwarming dinner, this gluten-free and dairy-free recipe promises not only to satisfy your taste buds but also to provide a healthier alternative to store-bought options.

Imagine the rich aroma of flavorful pork shoulder and savory spices filling your kitchen as you craft your very own sausages. This recipe is designed for all cooking enthusiasts, from beginners to seasoned chefs, and it serves five people—ideal for sharing at a gathering. Plus, with each serving boasting around 300 calories, you'll feel good about enjoying this delicious main course without the guilt!

The best part? You have the freedom to customize the flavors to your liking! With a unique blend of spices, fresh parsley, and a splash of sherry, these sausages are guaranteed to be a crowd-pleaser. Gather your ingredients, grab your meat grinder, and let’s embark on a culinary adventure that will leave every meal memorable. Who knew making homemade sausage could be such a fun and engaging process?

Ingredients

  • pounds boston butt pork shoulder 
  • pound fat 
  • 40 grams kosher salt 
  • 35 grams sugar 
  • 20 grams fennel seeds toasted
  • grams cracked pepper black
  • grams ground nutmeg 
  • cup parsley fresh minced
  • head garlic peeled chopped
  • 0.8 cup cooking sherry dry
  • 0.3 cup sherry vinegar 
  • servings meat grinder with coarse and fine dies - either kitchenaid with grinder attachment, a stand-alone grinder, or an old fashioned hand-cranked meat grinder
  • servings sausage stuffer 
  • rack wooden to hang sausages to dry
  • serving casings - hog casings 
  • servings casings - hog casings 

Equipment

  • bowl
  • frying pan
  • paper towels
  • plastic wrap
  • wooden spoon
  • stand mixer
  • kitchen twine

Directions

  1. Making Bulk Sausage
  2. Start with very cold ingredients and equipment: Make sure your ingredients are laid out, and the meat and fat are very cold (fat can be completely frozen), before you begin (put meat and fat in freezer for 2 hours). Put bowls and grinder in freezer or refrigerator for an hour before using them.
  3. Cut fat and meat into chunks, keep cold in bowl over ice: Prepare a large bowl of ice and put a medium metal bowl on top of it. Slice your meat and fat into chunks between an inch and two inches across.
  4. Cut your fat a little smaller than your meat.
  5. To keep your ingredients cold, put your cut meat and fat into the bowl set into a larger bowl filled with ice.
  6. Quickly mix meat and fat, add most of your spices, then chill: When the meat and fat are cut, mix them quickly.
  7. Pour in most of your spices; I leave out a tablespoon or two of fennel seeds and a tablespoon of black pepper for later.
  8. Mix quickly.
  9. Add the salt and the sugar and mix one more time.
  10. Put into a covered container or top the bowl with plastic wrap and put the sausage mixture into the freezer for at least 30 minutes and no more than an hour. Now you can call back whoever might have bothered you when you started this process.
  11. Meanwhile, mix ¼ cup of sherry vinegar and ¾ cup of dry sherry and put it in the fridge. I know sherry is not traditional in Italian sausage. You can use white wine and white wine vinegar if you’d rather (I save red wine and red wine vinegar for the hot sausages).
  12. Immerse casings in warm water: If you plan on stuffing your sausage, take out some of the casings (you need about 15-18 feet for a 5-pound batch of links) and immerse them in warm water. (If you are not planning on stuffing your sausage, you can skip this step.)
  13. Set up your grinder: After your sausage mixture has chilled, remove your grinder from the freezer and set it up. I use the coarse die for Italian sausage, but you could use either.
  14. Do not use a very fine die, because to do this properly you typically need to grind the meat coarse first, then re-chill it, then grind again with the fine die. Besides, an Italian sausage is supposed to be rustic.
  15. Quickly push mixture through grinder, then chill: Push the sausage mixture though the grinder, working quickly. If you use the Kitchen
  16. Aid attachment, use it on level
  17. Make sure the ground meat falls into a cold bowl.
  18. When all the meat is ground, put it back in the freezer and clean up the grinder and work area.
  19. Mix in remaining spices and sherry mixture: When you’ve cleaned up, take the mixture back out and add the remaining spices and the sherry-sherry vinegar mixture.
  20. Using the paddle attachment to a stand mixer (or a stout wooden spoon, or your VERY clean hands), mix the sausage well.
  21. With a stand mixer set on level 1, let this go for 90 seconds. It might take a little longer with the spoon or hands. You want the mixture to get a little sticky and begin to bind to itself – it is a lot like what happens when you knead bread.
  22. When this is done, you have sausage. You are done if you are not making links. To cook, take a scoop and form into a ball with your hands. Flatten out a bit. Cook on medium low heat in a skillet for 5-10 minutes each side until browned and cooked through.
  23. Additional Steps for Making Links
  24. Run warm water through casings and set up sausage stuffer: If you are making links, put the mixture back in the freezer and clean up again. Bring out your sausage stuffer, which should have been in the freezer or refrigerator.
  25. Run warm water through your sausage casings. This makes them easier to put on the stuffer tube and lets you know if there are any holes in the casings. Be sure to lay one edge of the flushed casings over the edge of the bowl of warm water they were in; this helps you grab them easily when you need them.
  26. Slip a casing onto the stuffing tube (And yes, it is exactly like what you think it is). Leave a “tail” of at least 6 inches off the end of the tube: You need this to tie off later.
  27. Add meat to the stuffer and start cranking the stuffer: Take the meat from the freezer one last time and stuff it into the stuffer. If all the meat will not fit, keep it in a bowl over another bowl filled with ice, or in the fridge while you stuff in batches. Start cranking the stuffer down. Air should be the first thing that emerges – this is why you do not tie off the casing right off the bat.
  28. Let the sausage come out in one long coil, then tie-off: When the meat starts to come out, use one hand to regulate how fast the casing slips off the tube; it’s a little tricky at first, but you will get the hang of it.
  29. Let the sausage come out in one long coil; you will make links later.
  30. Remember to leave 6-10 inches of “tail” at the other end of the casing. Sometimes one really long hog casing is all you need for a 5-pound batch.
  31. When the sausage is all in the casings, tie off the one end in a double knot. You could also use fine butcher’s twine.
  32. Pinch and spin links: With two hands, pinch off what will become two links. Work the links so they are pretty tight: You want any air bubbles to force their way to the edge of the sausage. Then spin the link you have between your fingers away from you several times.
  33. Repeat this process down the coil, only on this next link, spin it towards you several times. Continue this way, alternating, until you get to the end of the coil. Tie off the other end.
  34. Hang the sausages, and prick air bubbles with sterilized needle: Almost done. Time to hang your sausages. Hang them on the rack so they don’t touch (too much), and find yourself a needle. Sterilize it by putting into a gas flame or somesuch, then look for air bubbles in the links. Prick them with the needle, and in most cases the casing will flatten itself against the link.
  35. Let dry an hour or two then chill:
  36. Let these dry for an hour or two, then put them in a large container in the fridge overnight, with paper towels underneath. Package them up or eat them the next day. They will keep for a week, but freeze those that will not be used by then.

Nutrition Facts

Calories1500kcal
Protein25.63%
Fat70.56%
Carbs3.81%

Properties

Glycemic Index
61.02
Glycemic Load
5.97
Inflammation Score
-8
Nutrition Score
46.879565384077%

Flavonoids

Malvidin
0.02mg
Catechin
0.28mg
Epicatechin
0.2mg
Hesperetin
0.14mg
Naringenin
0.14mg
Apigenin
25.86mg
Luteolin
0.13mg
Kaempferol
0.2mg
Myricetin
1.87mg
Quercetin
0.15mg

Nutrients percent of daily need

Calories:1499.59kcal
74.98%
Fat:113.76g
175.02%
Saturated Fat:42.68g
266.75%
Carbohydrates:13.81g
4.6%
Net Carbohydrates:11.23g
4.08%
Sugar:7.73g
8.58%
Cholesterol:379.99mg
126.66%
Sodium:3553.05mg
154.48%
Alcohol:3.71g
100%
Alcohol %:0.75%
100%
Protein:92.98g
185.96%
Selenium:138.77µg
198.24%
Vitamin K:199.46µg
189.96%
Vitamin B3:33.59mg
167.96%
Vitamin B1:2.15mg
143.23%
Vitamin B6:2.74mg
136.84%
Phosphorus:969.4mg
96.94%
Zinc:8.82mg
58.77%
Vitamin B2:0.96mg
56.7%
Vitamin B5:5.16mg
51.62%
Potassium:1800.43mg
51.44%
Vitamin B12:2.32µg
38.69%
Magnesium:135.89mg
33.97%
Manganese:0.67mg
33.34%
Iron:5.45mg
30.29%
Vitamin C:23.12mg
28.03%
Vitamin A:1106.15IU
22.12%
Copper:0.38mg
19.18%
Vitamin D:2.51µg
16.73%
Calcium:129.67mg
12.97%
Fiber:2.58g
10.3%
Folate:39.7µg
9.92%
Vitamin E:1.08mg
7.22%