Peanut Butta Cups

Health score
1%
Peanut Butta Cups
105 min.
24
163kcal

Suggestions


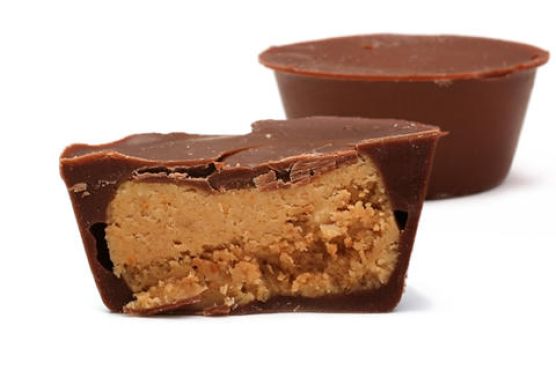
Indulge your sweet tooth with these delightful Peanut Butta Cups, a perfect treat for any occasion! With a rich, creamy peanut butter filling nestled inside a luscious layer of tempered milk chocolate, these bite-sized snacks are sure to impress your family and friends. Whether you're hosting a gathering or simply craving a delicious snack, these cups are an irresistible choice.

What makes this recipe truly special is the combination of textures and flavors. The crunchy peanut butter provides a satisfying bite, while the smooth chocolate coating adds a touch of elegance. Plus, the addition of graham cracker crumbs and powdered sugar creates a delightful sweetness that perfectly balances the richness of the chocolate.

Not only are these Peanut Butta Cups a treat for the taste buds, but they are also surprisingly easy to make! With just a few simple ingredients and some basic kitchen equipment, you can whip up a batch in about 105 minutes. Perfect for sharing, each recipe yields 24 servings, making them ideal for parties, potlucks, or just a cozy night in.

So, gather your ingredients and get ready to create a deliciously decadent snack that will have everyone coming back for more. Your taste buds will thank you!
Ingredients

  • 0.8 cup crunchy peanut butter (no added sugar)
  • 0.3 cup graham cracker crumbs 
  • pound chocolate coarsely chopped
  • 0.8 cup powdered sugar 

Equipment

  • bowl
  • sauce pan
  • baking paper
  • kitchen thermometer
  • stand mixer
  • spatula
  • muffin tray
  • pastry brush
  • mini muffin tray
  • palette knife

Directions

  1. For the filling:In the bowl of a stand mixer fitted with the paddle attachment, combine graham cracker crumbs, powdered sugar, and peanut butter.
  2. Mix on medium speed until filling is well combined, breaks into large chunks, and resembles cookie dough, about 3 minutes.Divide filling into 24 (2-teaspoon) balls, then form into round, compact shapes that will fit in the mini muffin pan wells. (Keep in mind that when the filling is in the wells, there should be enough room to cover it with chocolate.) Set aside.For the chocolate coating:To temper chocolate, fill a large bowl with 2 inches of cold water, add 3 to 4 ice cubes, and set aside.Bring a saucepan filled with 1 to 2 inches of water to a simmer over high heat; once simmering, turn off heat.
  3. Place 12 ounces of the chocolate in a dry heatproof bowl. Set the bowl over the saucepan and stir until chocolate is completely melted and reaches 118°F. (Make sure the chocolate does not come in contact with water or exceed 120°F. If either happens, start over, as the chocolate is no longer usable.)
  4. Remove the bowl from the saucepan.
  5. Add remaining 4 ounces chocolate and stir until all chocolate is melted and cools to 80°F. To speed the cooling process, after all chocolate has melted place the bowl over the reserved cold-water bath.Return the bowl to the saucepan and stir until chocolate reaches 86°F; immediately remove from heat. Do not remove the thermometer from the bowl; check the temperature periodically to make sure it stays between 85°F and 87°F. (The chocolate must remain in this temperature range or it will not set up properly.) Keep the saucepan over low heat and use it to reheat the chocolate as necessary.To test if the chocolate is properly tempered, spread a thin layer on parchment paper and place it in the refrigerator for 3 minutes to set. If the chocolate hardens smooth and without streaks, it is properly tempered. (If it is not properly tempered, you need to repeat the process.)Using a small pastry brush (or a small, clean paintbrush), liberally spread tempered chocolate inside each cup of the muffin pan. Try to make your coating as even as possible, aiming for about 1/16 inch thick.Divide filling among chocolate wells. (Don’t push too hard or you’ll crack the coating.) Spoon chocolate over each filling until completely covered. Scrape across the top of the muffin pan with a palette knife or a flat spatula to remove excess chocolate and even out candy tops.
  6. Place the pan in the freezer for 20 minutes to set up. To remove candies, place a towel or a silicone baking mat on a counter and hit one edge of the muffin pan against the counter. If the candies don’t come out easily, freeze them for another 5 minutes and try again. The Peanut Butta Cups will last up to 3 weeks in the refrigerator or up to 2 months in the freezer.
  7. Let come to room temperature before serving.

Nutrition Facts

Calories163kcal
Protein6.21%
Fat53.74%
Carbs40.05%

Properties

Glycemic Index
4.86
Glycemic Load
5.05
Inflammation Score
-2
Nutrition Score
3.2808696005655%

Nutrients percent of daily need

Calories:162.84kcal
8.14%
Fat:10.61g
16.32%
Saturated Fat:4.43g
27.67%
Carbohydrates:17.79g
5.93%
Net Carbohydrates:16.06g
5.84%
Sugar:14.34g
15.94%
Cholesterol:0mg
0%
Sodium:49.97mg
2.17%
Alcohol:0g
100%
Alcohol %:0%
100%
Caffeine:12.47mg
4.16%
Protein:2.76g
5.52%
Manganese:0.24mg
11.93%
Magnesium:34.94mg
8.74%
Copper:0.16mg
7.78%
Fiber:1.72g
6.9%
Vitamin B3:1.27mg
6.37%
Phosphorus:55.86mg
5.59%
Iron:0.73mg
4.03%
Vitamin E:0.56mg
3.71%
Zinc:0.53mg
3.54%
Vitamin B2:0.06mg
3.4%
Potassium:117.01mg
3.34%
Vitamin B6:0.04mg
2.15%
Folate:8.52µg
2.13%
Selenium:1.21µg
1.73%
Vitamin K:1.23µg
1.17%
Vitamin B5:0.1mg
1.04%
Source:Chow