Pizza Dough

Vegetarian
Vegan
Dairy Free
Health score
8%
Pizza Dough
45 min.
6
353kcal

Suggestions


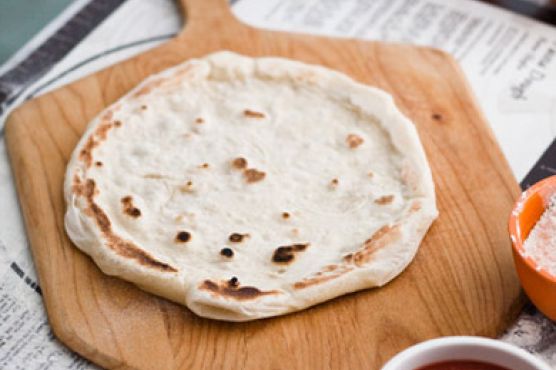
If you're craving a delicious homemade pizza that's not only vegetarian but also vegan and dairy-free, this pizza dough recipe is your ticket to culinary delight! With a beautiful crust that's crispy on the outside and soft on the inside, you can craft perfect pizzas that will impress family and friends alike. In just 45 minutes, you can create a base for your favorite toppings, transforming simple ingredients into a masterpiece of flavors.

The versatility of this dough means it's suitable for a variety of meals—whether you're whipping up a quick antipasti, a hearty appetizer, or just a fun snack, this recipe will fit the bill. Utilizing the unique properties of 00" flour, this dough promises a texture and taste that rivals your favorite pizzeria. It’s incredibly easy to follow, even for novice chefs, and allows you to take control of your ingredients, ensuring your meal is both healthy and satisfying.

Best of all, the dough can be parbaked and stored, making it an efficient choice for busy evenings or last-minute gatherings. With a few innovative toppings, you can cater to every palate, from classic Margherita to creative vegan combos. Get ready to unleash your creativity and become the pizza maker you've always aspired to be!

Ingredients

  • 0.3 ounce active yeast dry
  • 0.3 cup olive oil extra virgin 
  • 3.5 cups " flour 
  • tablespoons salt 
  • 1.5 teaspoons sugar 
  • 1.3 cups warm water (95°)

Equipment

  • bowl
  • frying pan
  • baking sheet
  • oven
  • knife
  • whisk
  • wire rack
  • plastic wrap
  • wooden spoon
  • kitchen thermometer
  • stand mixer
  • broiler
  • kitchen towels
  • rolling pin
  • toaster

Directions

  1. Whisk the warm water, yeast, and sugar together in a bowl.
  2. Let stand in a warm place for 10 minutes, or until the yeast is foamy.
  3. Combine the flour and salt in the bowl of a stand mixer fitted with the dough hook and mix well. With the mixer on low, add the yeast mixture and oil, mixing well. Continue to mix, gradually increasing the mixer speed to medium-high, until the dough is smooth and elastic.
  4. Transfer the dough to a lightly floured surface and give it a few turns by hand to finish kneading it; it will still be slightly sticky.
  5. Alternatively, combine the flour and salt in a large bowl and whisk together. Make a well in the center of the dry ingredients and add the yeast mixture and oil. Using a wooden spoon, stir the wet ingredients into the dry ingredients until the mixture is too stiff to stir, then mix with your hands in the bowl until the dough comes together and pulls away from the sides of the bowl. Turn the dough out onto the lightly floured work surface and knead, adding only as much flour as necessary to prevent sticking, until smooth elastic, and only slightly sticky.
  6. Transfer the dough to a large oiled bowl, turning to coat, cover with a kitchen towel or plastic wrap, and let rise in a warm place for 1 to 1 1/2 hours, until doubled in size.
  7. Punch down the dough and turn it out onto a well-floured work surface. Divide it into 8 pieces (about 4 ounces each) and shape each one into a ball. Cover with a tea towel and let stand for 15 minutes before stretching the dough. Or, for easier handling, transfer the balls to a floured baking sheet and refrigerate until cold.
  8. Dust a large work surface with a mixture of flour and semolina. If the dough has been refrigerated, transfer one ball to work surface and let stand just until still cool but not cold ( about 60°F if tested with an instant-read thermometer).
  9. Meanwhile, preheat the griddle pan over medium heat until very hot, about 5 minutes (at the restaurant, we use a digital infrared thermometer to gauge the temperature of the griddle, which, ideally, should be 375°F).
  10. Using your hands, begin to press and stretch the dough into a 9- to 10- inch round, adding only enough additional flour and semolina to the work surface to keep the dough from sticking; using one hand as a guide, slope a slightly thicker rim all around the circle of dough. Work quickly, and be careful not to overwork the dough; if it resists or shrinks back as you shape it, let it rest briefly before proceeding. (If you prefer, you can roll out the dough with a rolling pin. Lightly flour the work surface and the rolling pin; sprinkle the rolling pin with more flour as necessary to prevent sticking.)
  11. Carefully place the dough round on the pre-heated griddle pan and cook until barely tan on the first side and browned in a few spots, 2 to 3 minutes. As the crust cooks, if you see any parts that remain undercooked, especially any thicker parts, simply press them against the pan so they cook a bit more; once the dough has set, you can move the crust around as necessary for more even cooking. Flip the crust over and cook until the second side is completely dry, about 1 minute longer.
  12. Transfer the crust to a wire rack or baking sheet, brushing off any excess flour, and allow to cool. Repeat with the remaining dough. (The parbaked crusts can be refrigerated overnight or frozen, well wrapped, for up to 2 weeks. Sometimes when you go through the effort of preparing all these steps, it might be work making more than you want to eat and then, depending on the toppings, freezing the extra finished pizzas. Occasionally I'll come home on a Sunday night and reheat a frozen pizza I made on Friday in the toaster oven—a great snack in less than 10 minutes, with absolutely no effort.)
  13. We recommend making only one pizza at a time and serving each one as soon as it is done. If you need to make a lot for a large party, cook several of them once (slightly undercook them) and then reheat them in a warm oven before serving.
  14. Place the parbaked pizza crust on a pizza peel or baking sheet.
  15. Spread the tomato sauce evenly over the crust, leaving a 1/2 inch border all around, and top with any remaining ingredients as specified in the individual recipe. (Do not put the sauce and any other ingredients on the pizza crust until ready to broil it, or the crust may become soggy.)
  16. Slide the pizza under the broiler, about 4 inches from the heat source, and broil for 7 or 8 minutes (or as otherwise noted in the individual recipe), until the topping ingredients are heated and/or cooked through and crust is charred and blistered in spots. Watch closely so that the ingredients don’t burn, and move the pizza around or lower the broiler rack if necessary. (Sometimes during this stage, depending on the topping, the bottom may start to become soggy; if that happens, you can simply slip the pizza back onto the griddle momentarily to recrisp the crust.) And, if you prefer more color—as we do!—move the pizza closer to the heat source at the very end.
  17. Finish the pizza with any remaining ingredients, as described in the individual recipe, and cut into slices with a pizza wheel, kitchen shears, or a very sharp knife.
  18. Serve hot.
  19. Reprinted with permission from Molto Gusto: Easy Italian Cooking by Mario Batali and Mark Ladner, © 2010 Ecco

Nutrition Facts

Calories353kcal
Protein9.18%
Fat25.31%
Carbs65.51%

Properties

Glycemic Index
24.18
Glycemic Load
40.95
Inflammation Score
-5
Nutrition Score
11.864782535916%

Flavonoids

Apigenin
0.01mg
Luteolin
0.01mg

Nutrients percent of daily need

Calories:352.67kcal
17.63%
Fat:9.81g
15.09%
Saturated Fat:1.37g
8.54%
Carbohydrates:57.13g
19.04%
Net Carbohydrates:54.84g
19.94%
Sugar:1.19g
1.33%
Cholesterol:0mg
0%
Sodium:2330.2mg
101.31%
Alcohol:0g
100%
Alcohol %:0%
100%
Protein:8.01g
16.02%
Vitamin B1:0.7mg
46.82%
Folate:161.08µg
40.27%
Selenium:24.82µg
35.46%
Manganese:0.51mg
25.35%
Vitamin B2:0.41mg
23.98%
Vitamin B3:4.78mg
23.9%
Iron:3.48mg
19.33%
Fiber:2.29g
9.15%
Vitamin E:1.34mg
8.93%
Phosphorus:86.27mg
8.63%
Copper:0.12mg
6%
Vitamin K:5.64µg
5.37%
Vitamin B5:0.48mg
4.79%
Magnesium:17.23mg
4.31%
Zinc:0.62mg
4.1%
Potassium:89.89mg
2.57%
Vitamin B6:0.05mg
2.49%
Calcium:14.31mg
1.43%
Source:Epicurious