Quince Jelly

Dairy Free
Quince Jelly
45 min.
40
116kcal

Suggestions


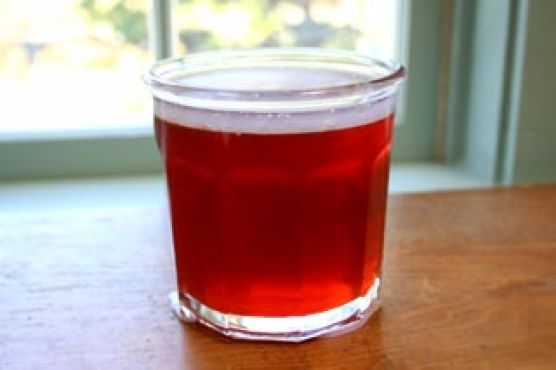
Quince jelly is a delightful and versatile condiment that brings a unique flavor to your table. With its beautiful amber hue and sweet-tart taste, this jelly is perfect for spreading on toast, pairing with cheese, or adding a touch of elegance to your favorite dishes. Made from the often-overlooked quince fruit, this recipe is not only dairy-free but also a fantastic way to preserve the essence of fall in a jar.

In just 45 minutes, you can create a batch that serves up to 40 people, making it an ideal choice for gatherings or as thoughtful homemade gifts. The process of making quince jelly is both rewarding and simple, requiring just a few key ingredients and some basic kitchen equipment. As you simmer the quince and extract its juice, the aroma will fill your kitchen, enticing everyone around.

What sets this recipe apart is the balance of flavors achieved by combining the natural sweetness of the quince with just the right amount of sugar. The result is a jelly that is not overly sweet, allowing the unique flavor of the quince to shine through. Whether you enjoy it as a dip, spread, or condiment, quince jelly is sure to impress your family and friends. So roll up your sleeves and get ready to embark on a delicious culinary adventure!

Ingredients

  • 40 servings candy thermometer 
  • 40 servings potato masher 
  • 3.5 lbs quinces washed cored quartered (leave skin on)
  • 0.9 cup enough sugar to add almost a cup of sugar ) for every cup of juice ( 4 cups
  • cups water 
  •  wide 6 with stainless steel lining)

Equipment

  • frying pan
  • ladle
  • oven
  • pot
  • sieve
  • potato masher
  • stove
  • cheesecloth
  • canning jar
  • candy thermometer

Directions

  1. Put quince pieces in a large stockpot with a thick bottom and add water (if you are eyeballing it, put in enough water to cover the pieces of quince by about an inch.)2 Bring to a boil, reduce heat to simmer, cover and cook for 45 minutes to an hour, until the quince pieces are soft.Mashing the pulp3 With a potato masher, mash the quince to the consistency of slightly runny applesauce.
  2. Add more water if necessary. If the mash is too thick, you won't get enough juice out of it.George testing the consistency of the quince pulp
  3. Straining juice from pulp with cheesecloth4 To strain the juice from the pulp, place a metal strainer over a pot. Drape 2 layers of cheesecloth over the strainer. (Can skip the cheesecloth if you are using a fine mesh strainer). Ladle the pulp into the cheesecloth. You may need to have two strainers set up this way.
  4. Let the pulp strain for 3 to 4 hours. If you aren't getting enough juice out of the pulp, you may need to mix more water into the mash.Watching the thermometer5 Measure the amount of juice you have. Should be about 4 to 5 cups.
  5. Pour into a thick-bottomed pot on the stove and bring to a boil. Measure out the sugar - a little less than a cup for every cup of juice.
  6. Add sugar to the juice. 6 Bring to a boil, initially stirring constantly, until the sugar is dissolved, so that the sugar does not stick to the bottom of the pan. Insert a candy thermometer to monitor the jelly temperature.What the juice looks like before it cooks
  7. Skimming the foam7 As the jelly cooks, skim off the foam that comes to the surface with a spoon.8 As the jelly is boiling, in a separate pan, melt some parafin wax for a seal and sterilize jars for canning.9 As the temperature rises above the boiling point of water (212°F), you will notice the consistency of the jelly/juice begins to change. When the temperature is approximately 8 degrees higher than boiling point at your altitude (anywhere from 220°F to 222°F at sea level) the jelly is ready to pour into jars. Left: Jelly is too runny. Right: Jelly is wrinkling when pushed, which means it's ready.Note that candy thermometers aren't always the most reliable indicators of whether or not a jelly is done. Another way to test is put a half teaspoonful of the jelly on a chilled (in the freezer) plate. Allow the jelly to cool a few seconds, then push it with your fingertip. If it wrinkles up, it's ready.Boiling
  8. Almost done10 There are several ways to sterilize your jars for canning. You can run them through a short cycle on your dishwasher. You can place them in a large pot (12 quart) of water on top of a steaming rack (so they don't touch the bottom of the pan), and bring the water to a boil for 10 minutes. Or you can rinse out the jars, dry them, and place them, without lids, in a 200°F oven for 10 minutes.11 Use a large ladle to pour the jelly into the sterilized jars to 5/8 inch from the top rim of the jar.
  9. Pour in enough melted parafin to add a 1/4 inch layer of wax. The parafin will float to the top, cool, and harden forming a seal over the jelly as it cools. (If you aren't using parafin, use canning jars with canning lids. Sterilize the lids by letting them sit in just boiled hot water for a few minutes. You will hear a popping noise as a vacuum seal is created as the jars of jelly cool.)Sealing with parafin

Nutrition Facts

Calories116kcal
Protein3.02%
Fat26.88%
Carbs70.1%

Properties

Glycemic Index
5.82
Glycemic Load
5.05
Inflammation Score
-1
Nutrition Score
1.2782608631836%

Flavonoids

Catechin
0.3mg
Epicatechin
0.27mg
Kaempferol
0.01mg
Quercetin
0.01mg

Nutrients percent of daily need

Calories:115.63kcal
5.78%
Fat:3.56g
5.48%
Saturated Fat:2.17g
13.59%
Carbohydrates:20.88g
6.96%
Net Carbohydrates:19.7g
7.16%
Sugar:13.76g
15.28%
Cholesterol:2.27mg
0.76%
Sodium:13.97mg
0.61%
Alcohol:0g
100%
Alcohol %:0%
100%
Protein:0.9g
1.8%
Vitamin C:6.24mg
7.56%
Fiber:1.18g
4.73%
Copper:0.06mg
2.98%
Iron:0.47mg
2.63%
Potassium:82.55mg
2.36%
Calcium:23.18mg
2.32%