Quince Jelly

Vegetarian
Vegan
Gluten Free
Dairy Free
Popular
Low Fod Map
Quince Jelly
45 min.
40
40kcal

Suggestions


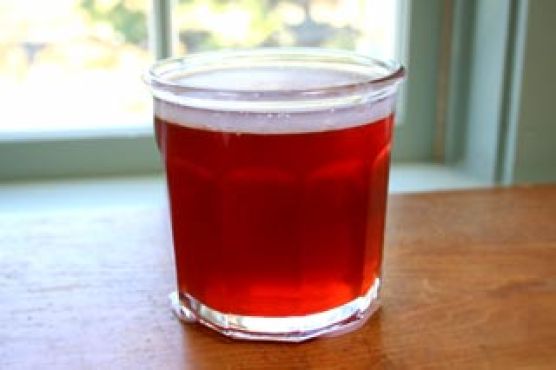
Looking for a delicious and unique condiment to elevate your meals? Quince Jelly might just be the answer! This delightful spread is not only vegetarian and vegan but also gluten-free and dairy-free, making it suitable for a variety of dietary preferences. With its captivating golden hue and exquisite flavor, quince jelly is a delightful addition to your kitchen pantry.

Imagine spreading this luscious jelly on warm, crusty bread or pairing it with your favorite cheese for a sophisticated appetizer. The process of making quince jelly is both rewarding and enjoyable, allowing you to immerse yourself in the art of preserving. Made with just quince, water, and sugar, this jelly is simple yet full of flavor, showcasing the natural sweetness of quince fruit.

Taking about 45 minutes from start to finish, you'll find that each jar of quince jelly is as rewarding as the next. Perfect for gatherings, this recipe yields enough jelly to serve 40 people, making it a crowd-pleaser at parties or a thoughtful homemade gift for friends and family. Rich in pectin, quince creates a beautifully set jelly that is perfect for drizzling, spreading, or using as a dip. So why not give this charming recipe a try and let the sweet aroma of cooking quince fill your home?

Ingredients

  • 1.6 kg quinces washed cored quartered (leave skin on)
  • 1.6 liters water 
  • 0.9 cup enough sugar to add almost a cup of sugar ) for every cup of juice ( 4 cups

Equipment

  • frying pan
  • sauce pan
  • ladle
  • oven
  • pot
  • sieve
  • potato masher
  • stove
  • cheesecloth
  • candy thermometer

Directions

  1. First Stage of Cooking
  2. Cover quince with water: Put quince pieces in a large stockpot with a thick bottom and add water (if you are eyeballing it, put in enough water to cover the pieces of quince by about an inch.)
  3. Cook quince until soft: Bring to a boil, reduce heat to simmer, cover and cook for 45 minutes to an hour, until the quince pieces are soft.
  4. Mash cooked quince: With a potato masher, mash the quince to the consistency of slightly runny applesauce.
  5. Add more water if necessary. If the mash is too thick, you won't get enough juice out of it.
  6. Place a metal strainer over a pot. Drape 2 layers of cheesecloth over the strainer. (Can skip the cheesecloth if you are using a fine mesh strainer). Ladle the pulp into the cheesecloth. You may need to have two strainers set up this way.
  7. Let the pulp strain for 3 to 4 hours. If you aren't getting enough juice out of the pulp, you may need to mix more water into the mash.
  8. Measure the juice and add sugar
  9. Add sugar: Measure the amount of juice you have. Should be about 4 to 5 cups.
  10. Pour the strained quince juice into a thick-bottomed pot on the stove and bring to a boil. Measure out the sugar - a little less than a cup for every cup of juice.
  11. Add sugar to the juice.
  12. Second stage of cooking
  13. Bring to a boil: Bring to a boil, initially stirring constantly, until the sugar is dissolved, so that the sugar does not stick to the bottom of the pan. Insert a candy thermometer to monitor the jelly temperature.
  14. Skim foam: As the jelly cooks, skim off the foam that comes to the surface with a spoon.
  15. Sterilize jars: As the jelly is boiling, sterilize your jars for canning. (See section below on canning.)
  16. Look for the set point: As the temperature rises above the boiling point of water (212°F), you will notice the consistency of the jelly/juice begins to change. When the temperature is approximately 6 to 8 degrees higher than boiling point at your altitude (anywhere from 218°F to 220°F at sea level) the jelly is ready to pour into jars. (Quince has so much pectin, it can set earlier than other types of jellies.)
  17. Left: Jelly is too runny. Right: Jelly is wrinkling when pushed, which means it's ready.
  18. Note that candy thermometers aren't always the most reliable indicators of whether or not a jelly is done. Another way to test is put a half teaspoonful of the jelly on a chilled (in the freezer) plate. Allow the jelly to cool a few seconds, then push it with your fingertip. If it wrinkles up, it's ready.
  19. Canning
  20. Sterilizing jars: There are several ways to sterilize your jars for canning. You can run them through a short cycle on your dishwasher. You can place them in a large pot (12 quart) of water on top of a steaming rack (so they don't touch the bottom of the pan), and bring the water to a boil for 10 minutes. Or you can rinse out the jars, dry them, and place them, without lids, in a 200°F oven for 10 minutes. Sterilize canning lids by letting them sit in just boiled hot water for a few minutes.
  21. Ladle jelly into jars and seal: Use a large ladle to pour the jelly into the sterilized jars to 5/8 inch from the top rim of the jar. Seal the top with a canning lid and ring. You will hear a popping noise as a vacuum seal is created as the jars of jelly cool.
  22. If you want to use paraffin wax to seal the jars instead of the canning lids, melt some paraffin in a separate small saucepan.
  23. Pour enough melted paraffin over the jelly in the jars to add 1/4-inch layer of wax to the top. The paraffin wax will float to the top, cool, and harden, forming a seal over the jelly as it cools. Note that this method is no longer endorsed by current canning experts because sometimes it doesn't seal perfectly, and mold can get in.

Nutrition Facts

Calories40kcal
Protein1.49%
Fat1.13%
Carbs97.38%

Properties

Glycemic Index
2.63
Glycemic Load
4.93
Inflammation Score
-1
Nutrition Score
1.0069565226364%

Flavonoids

Catechin
0.3mg
Epicatechin
0.27mg

Nutrients percent of daily need

Calories:39.64kcal
1.98%
Fat:0.05g
0.08%
Saturated Fat:0g
0.02%
Carbohydrates:10.48g
3.49%
Net Carbohydrates:9.72g
3.53%
Sugar:4.37g
4.85%
Cholesterol:0mg
0%
Sodium:3.64mg
0.16%
Alcohol:0g
100%
Alcohol %:0%
100%
Protein:0.16g
0.32%
Vitamin C:6mg
7.27%
Fiber:0.76g
3.04%
Copper:0.06mg
2.94%
Potassium:78.89mg
2.25%
Iron:0.28mg
1.57%