Raspberry Double-Crust Jar Pie

Vegetarian
Gluten Free
Low Fod Map
Raspberry Double-Crust Jar Pie
180 min.
8
273kcal

Suggestions


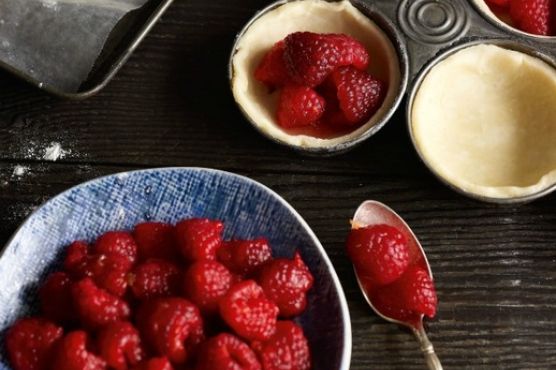
Indulge in the delightful experience of making a Raspberry Double-Crust Jar Pie, a dessert that not only tantalizes your taste buds but also caters to various dietary preferences. This vegetarian, gluten-free, and low FODMAP treat is perfect for gatherings, family dinners, or simply a cozy night in. Imagine the sweet and tangy burst of fresh raspberries enveloped in a flaky, buttery crust, all served in charming individual jars that make for an eye-catching presentation.

What sets this recipe apart is its unique double-crust design, allowing you to enjoy the perfect balance of crust and filling in every bite. The process of creating these mini pies is as enjoyable as the final product, making it a fun activity for both seasoned bakers and novices alike. With a preparation time of just three hours, you can easily whip up a batch for your next event or simply to satisfy your sweet cravings.

As you embark on this culinary adventure, you'll appreciate the simplicity of the ingredients and the joy of crafting each pie from scratch. The combination of fresh raspberries, a hint of lemon zest, and a perfectly baked crust will leave your guests raving about your baking skills. So, roll up your sleeves, gather your ingredients, and get ready to impress with these delightful Raspberry Double-Crust Jar Pies!

Ingredients

  • servings butter 
  •  eggs 
  • 0.3 cup granulated sugar dark light loosely packed
  • tablespoons water 
  • teaspoon kosher salt 
  • 0.5 teaspoon lemon zest grated
  • teaspoon sugar 
  • cup butter unsalted cold cut into 1/2-inch cubes

Equipment

  • bowl
  • baking sheet
  • baking paper
  • oven
  • knife
  • whisk
  • plastic wrap
  • cookie cutter

Directions

  1. Cut the butter into 1/2-inch pieces, and freeze them while you measure and mix the dry ingredients.
  2. Combine the flour, sugar, and salt in the processor and pulse three or four times to mix. Retrieve the butter cubes from the freezer, scatter them over the flour mixture, and pulse until the mixture forms pea-size clumps.
  3. Add the ice water, 1 tablespoon at a time, and pulse to mix, adding just enough water for the dough to come together. To make the dough by hand: In a large bowl, whisk together flour, sugar, and salt. Retrieve the butter cubes from the freezer and distribute them evenly in the flour mixture, coating them with the flour mixture. Sink your fingers into the mixture and begin pinching the butter and flour together, making thin, floury disks of the butter. Continue working the mixture until the butter is broken down first into floury pea-sized beads and then into a loose mixture that resembles wet sand.
  4. Drizzle in 3 tablespoons of the ice water and use your hand like a comb to mix in the liquid just until the dough holds together. If necessary, add additional water, 1 tablespoon at a time, until the dough comes together in a crumbly mass.
  5. Turn the dough out onto a clean, floured work surface or sheet of parchment paper. Gather the dough together in a mound, then knead it a few times to smooth it out. Divide it in half, and gently pat and press each half into a rough rectangle, circle, or square about 1 inch thick. The shape you choose depends on what shape you will be rolling out the dough. If you don’t know how you will be using the dough at this point, opt for a circle. Wrap in plastic wrap or in the parchment paper and refrigerate for at least 2 hours or up to 3 days.
  6. For the Pies: Have eight half-pint jars ready.
  7. Remove half of the dough from the refrigerator.
  8. Lightly flour a clean work surface. Unwrap the dough, place it on the floured work surface, and flour the top lightly.
  9. Roll out the dough into a square measuring 12 to 14 inches and about 1/8 inch thick.
  10. Cut the square into six uniform squares or circles.
  11. Roll out the remaining half of the dough the same way and cut out two more squares or circles of the same size and eight circles the same size as the mouth of the jar. You can flip over a jar and use it to cut these circles (it’s a perfect fit!), or use a biscuit or cookie cutter. If needed, gather the dough scraps from both halves, form into a ball, and roll out to cut more circles. (Reroll the dough only once or it will bake up tough.)
  12. To line each jar, hold the jar in your nondominant hand (left hand if you are right-handed, for example) and pick up a square or circle dough in your other hand. Position the dough over the jar mouth and then gently stuff it into the jar, pressing it against the bottom and up the sides of the jar and centering it as you work. Then, using your thumbs, press the dough gently against the sides of the jar while rotating the jar slowly in a clockwise motion. Make sure the dough is clinging to the sides of the jar. It should not extend more than three-fourths of the way up the sides of the jar. Repeat to line the remaining jars.
  13. Alternatively, carefully lift the dough round or square and fold it in half. Then, with the folded side down and the open edges facing up, lower the dough into the jar, open it, and press the dough from the middle outward to the sides of the jar.
  14. For the Filling: In a bowl, combine all of the ingredients, adding the sugar to taste.
  15. Mix gently so as not to crush the berries. Use immediately.
  16. To fill the Pies: Fill each pastry-lined jar with about 2/3 cup. Do not fill the crusts to the top. (The jars should be no more than three-fourths full.) You want to leave at least 1/4 inch of dough above the filling uncovered so you can attach the top crust. Now, lay a dough circle on top of the filling in each jar, and use your fingers or a fork to tease the edges of the crusts gently together.
  17. Cut a few small slashes in the top of each pie to allow the steam to vent. Refrigerate for at least 30 minutes or up to 24 hours. (At this point, the unbaked pies can be covered with a lid and frozen for up to 2 months.)
  18. Preheat the oven to 375°F. Just before baking, in a small bowl, whisk together the egg and 1 tablespoon water until blended.
  19. Brush the top crust of each pie with the egg mixture.
  20. Arrange the jars on a rimmed baking sheet, place in the oven, and bake until the top and side crusts are golden, about 25 minutes.
  21. Remove from the oven and let cool on a baking rack for at least 1 hour before serving.
  22. Once the pies have cooled for 1 hour, they can be popped out of the jars. Holding a jar in your nondominant hand, run a sharp, thin knife around the inside rim of the jar with your other hand to loosen any filling that may have stuck to the glass. Then gently invert the pie into your palm. It should slide from the jar with little resistance. If it sticks, coax it out gently by running the knife along the inside edge of the jar. Once the pie slides free of the jar, quickly invert it onto a plate or the baking rack.
  23. Serve warm or at room temperature.

Nutrition Facts

Calories273kcal
Protein1.4%
Fat88.87%
Carbs9.73%

Properties

Glycemic Index
23.77
Glycemic Load
4.71
Inflammation Score
-4
Nutrition Score
1.9426087311105%

Nutrients percent of daily need

Calories:273.21kcal
13.66%
Fat:27.61g
42.48%
Saturated Fat:17.32g
108.24%
Carbohydrates:6.8g
2.27%
Net Carbohydrates:6.79g
2.47%
Sugar:6.78g
7.54%
Cholesterol:92.22mg
30.74%
Sodium:334.12mg
14.53%
Alcohol:0g
100%
Alcohol %:0%
100%
Protein:0.98g
1.96%
Vitamin A:863.8IU
17.28%
Vitamin E:0.83mg
5.55%
Vitamin D:0.54µg
3.57%
Selenium:2.06µg
2.95%
Vitamin K:2.35µg
2.24%
Vitamin B2:0.04mg
2.23%
Phosphorus:18.92mg
1.89%
Vitamin B12:0.11µg
1.76%
Vitamin B5:0.12mg
1.21%
Calcium:11.67mg
1.17%